So far I've only been showing you ways to re-purpose old clothing or fabrics, but there are so many other ways to re-purpose in your home!
If you've taken this challenge with me during 2012, it's time for me to give you another idea to work with!
Plastic containers are part and parcel of many things we purchase. Mr E and I take a few dietary supplements which are packaged in small plastic bottles - convenient, but at the end of their use we toss them into the rubbish bin and a new bottle is opened.
I've decided it's time to make use of them and save the landfill!
Yesterday I finished a bottle of COQ10, and today I am going to show you how the empty bottle has been given a new occupation.
You will need one plastic vitamin, or similar sized, bottle.
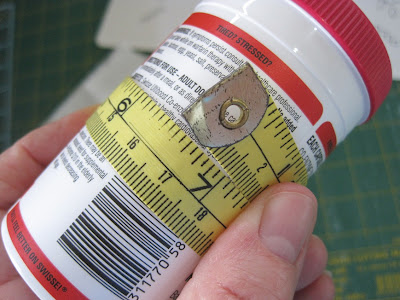
Measure the 'useable' height of the bottle...
Measure the circumference...
Add 1/2" to the height, and 3/4" to the circumference. Take note of the measurements.
Cut a piece of plain fabric to the height + 1/2" you've measured, and make it as long as you like, but not longer than the circumference + 3/4". Trace a small design to stitch in the centre. I used the bird from this month's "Promises & Borders" block, and added a few flowers.
I fused some Whisperweft fabric stabiliser to the back of the traced fabric before stitching the design.
(Many people have emailed recently asking if I use a hoop when I stitch. No, I don't. I don't like them.)
Hmmm, see the word? That's a hint on where I am going with this.
Once stitched I trimmed the excess fabric from the sides, but left the height as it was.
(You might like to use all the same fabric as the stitchery)
I added some fabric scraps to each end of the stitchery, before trimming them to the circumference + 3/4" that I had originally measured.
I cut another piece of fabric the same size for the backing.
I also cut a piece of thin fusible Pellon, but this was cut to the exact measurements I first made of the bottle.
Fuse the Pellon to the back of the stitched block.
Lay this face down onto the right side of the backing fabric, and sew around the four sides with a 1/4" seam, leaving a 2" opening at one end for turning out.
Trim the points from the corners, and turn right side out. Ladder stitch the opening closed.
Quilt some running stitches just inside the edge of the bottle wrapper.
Ladder stitch the two short ends together...
Make a large yo-yo (suffolk puff) for the lid, glue it down, slip the bottle wrap around your bottle, and fill with pins!
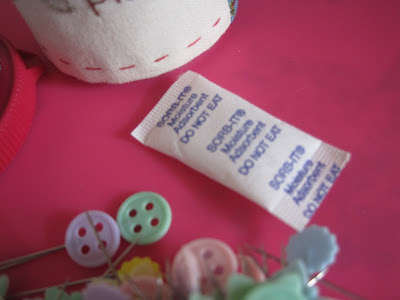
I kept the moisture pack from the vitamin bottle and popped it in with the pins to avoid any rusting. Wonderful for my tropical humidity!
Voila!
~~~~~
I received an email asking for help in satin-stitching the bird's beak in Block 3 of "Promises and Borders".
You use just one strand of thread for this, because the beak is tiny.
Here is a diagram of each stitch.
Make one long stitch down the outer edges of the beak, top and bottom.
Next you make gradually shorter stitches parallel with the top line of the beak.
Hope that helps!
~~~~~
If you have an idea for re-purposing empty plastic bottles or glass jars, leave a comment so we can share in your wisdom!
If you want to show us what you're doing to re-purpose your bottles and jars, why not do a tutorial on your blog and let me know so I can send all of us over to visit.
Have a wonderfully productive day!!
Hugs
Jenny
xx


29 comments:
Very clever the way you turned it all inside out - I have some tins I want to cover and will use your little tip - thanks Jenny!
So cute! The design you've shared is really simple but it works well. And by the way, I like the way you wrote this tutorial. Each and every step is well-explained. Well done!
great idea Jenny.xx
Wow, thanks Jenny! This is a brilliant idea. Will definitely be making a few of these. Great little project to work on when I need a break from the big ones.
Fantastic idea Jen. I love it. Hugs,
Looks really fantastic! I have seen how to re-use small pots on a Dutch side, I will ask her if I can share it with you! Greetings
Lida
Brilliant idea! These could come in handy for storing bobby pins(hair clips)too :O)
Darling, Jenny - I have a few medicine bottles that I use for pins, etc, but never thought to make them pretty! Love this idea!
A pretty and useful way to recycle.
Hi!
Might I suggest some fine sand, crushed walnut shells or birdseed gravel (which is what I use) to the bottom of the container before inserting the pins? I think it would help keep the sharp points sharp! (instead of hitting the plastic buttom and getting dull).
Take care, Leslie
This is sweet,Jenny. Thanks for sharing the idea and your tutorial. I recently covered a 796 ml tomato can and shared it on my blog. Your method is much easier. I quite enjoy re-purposing.
Oh Jenny you are so smart! I have thrown away many containers because I didn't know what to do with them. Thanks for the great idea!
That pin holder is a lovely idea Jenny. I can't wait to finish my next lot of vitamins. Thanks, Tracee xx
I love this idea. I have several bottles/jars that I am already using but they will look so much prettier now! :) Thanks for the tutorial.
great idea. thanks for sharing.
Jenny, wonderful idea. I have been reusing prescription pill bottles for this purpose but had not thought to cover them.
I have one bottle marked as hazardous that I use for broken needles, pins, and old rotary blades as I hate to just through them in the trash or recycling for fear that someone will cut or stab themselves.
I love this idea. What a neat way to cover a small plastic bottle and make it pretty and useful! :)
Your genius shines through with this project, Jenny!! Thanks for the excellent tute. ~karen
that is so cute & clever! (as usual...)
What a cute little place for pins and a wonderful way to reuse a bottle. Thanks for the beak tutorial.
Hi Jenny. I just found your blog and I love it!
Cute idea for pins.
Thank you for sharing.
That's a lovely project, i have some tins and some scrap fabric Icould use to make something similar!
Another fantastic idea! I have some ideas for re-use in my blog. Normally, I use paint and decoupage. One technique that I like is the "Couro Argentino". It has a step by step there. I would love to receive your visit!
hugs,
Love your idea! Much more creative than my uses, though I often take small glass jars those pricey eye creams come in, wash the labels off and store beads for my crazy quilting in them. There are hundreds of beads in a tube or on a hank, whichever way one buys them, and it's much easier to use them out of the small flat jars. I could stitch something for the lid, though the jar part is usually only about 3/4" tall. I've also put pincushions on top of the round Altoids tins and buttons inside them.
HI, Jenny. I loved the idea you had to cover bottles.It makes them look so pretty.You could use these to hold buttons or any small objects.Back several years ago, I went to the photo shop and asked them for the empty containers that were left after people had their film developed. I now use these for sequins and beads. They really work great for that.Ummm-now if I could make them look pretty!
Hello Jenny,
Having a few computer issues during the storms down here and my issue no 5 has disappeared from the computer. I have managed to print all the other issues. ie 1-9 Would you mind sending me another link for it please.
Love the end result. I'm off to check if the vitamin bottle is empty so I can make my own!
One question about satin stitch on the beak--do you stitch inside or outside of the thread in line 2?
Your repurposing just motivated me to pull out some of my shoes and clothing that I would have finally discarded and gave it a makeover this weekend. Thank you.
Post a Comment