
Today we'll be making our scissor scabbard and the needlebook for your Hussif.

The free template needed for the scabbard shape can be download here in the day one post.
SCISSOR SCABBARD
Place a piece of clear template plastic over the scabbard shape on your pattern sheet and trace the outline. Cut out the plastic scabbard shape.
(alternatively, you could cut out the paper shape from your pattern
sheet, but I like plastic templates because I can reuse them over and
over)

Trace the shape onto the fusible side of a scrap of Pellon, and cut the shape out along the traced line.
(I was asked by a few ladies how thick is the Pellon I'm using - it's about 1/8th of an inch)

If you are making the embroidered version of the Hussif, trace the scabbard stitchery onto a piece of pale tonal fabric with your normal tracing pen, then fuse a piece of fabric stabiliser (I used weaveline which is as thin as paper) behind the traced design.
Next, trace the scabbard shape around the stitchery design with a heat erasable pen.


Fuse the scabbard-shaped piece of Pellon behind the traced shape on your embroidery block using the heat erasable line for correct placement.

When you iron the fabric and Pellon together the line will disappear.


Embroider the design before going any further.

If you're making the fussy cut version of the Hussif, choose a section of fabric that features a motif which will fit inside the shape of the scabbard.
Follow the same steps for tracing the scabbard and fusing the Pellon behind your chosen section of fabric as used above.
I chose a single stem rose for my motif...

Assembling the scabbard:
Lay the front of your scabbard block face down on another piece of fabric. That fabric will become the back of your scabbard.

Use your sewing machine to stitch around the sides, base, and top left and right edges of the scabbard, securing the front and back together. I stitched very close to the Pellon but did not sew over it.
Be sure to leave an opening along the top edge.

Cut away your scabbard from the excess fabrics, leaving an 1/8th of an inch seam around the sides and bottom, and a 1/4 inch seam above the opening on the top edge.

Turn the scabbard right side out.
Press the opening inside the scabbard...


Blind stitch it closed.

Pin your scabbard in place on the bottom left of your Hussif...

...and blind stitch it to the Hussif around the sides and base.


The NEEDLE-BOOK
Trace the heart shape from your free templates pattern sheet onto the rough side of some fusible web (applique bonding paper such as Vliesofix).
Fuse the traced heart, rough side down, onto the back of your scrap of fabric.
Cut out the shape along the traced line and peel off the fusible web...

Cut a piece of fabric 4 1/2" high x 5" wide. Fold in half along the width, and fuse your heart below the fold line, onto the centre of this half of your fabric....


Blanket stitch applique around the heart.
Cut a piece of very thin fusible Pellon, Parlan or wadding 1 7/8" x 4 3/8"...

Turn your heart over and fuse the wadding behind it so that it sits just under the fold line in the centre of the fabric...

Fold the needlebook cover in half along the fold line, right sides together and sew a 1/4" seam down one side, along the bottom edge, and about 1/4" up the other side...


Turn the needlebook cover right side out, press in the open seam.

Blind stitch the opening closed the same way you did with the scissor scabbard.
Hand sew a line of running stitch around the heart with two strands of embroidery thread.

NEEDLE-BOOK POCKET
Cut a piece of fabric 6 1/2" x 7" and fold it in half so that it measures 6 1/2" x 3 1/2". Press.
(please note: my spot fabric for the pocket was a scrap I had on hand and measured wider than the
6 1/2" so I trimmed this back later)

Cut a piece of doctor's flannel (or wool felt) 1 3/4" x 3 3/4" and pin it to the centre of the pocket, about 3/8" below the fold line.
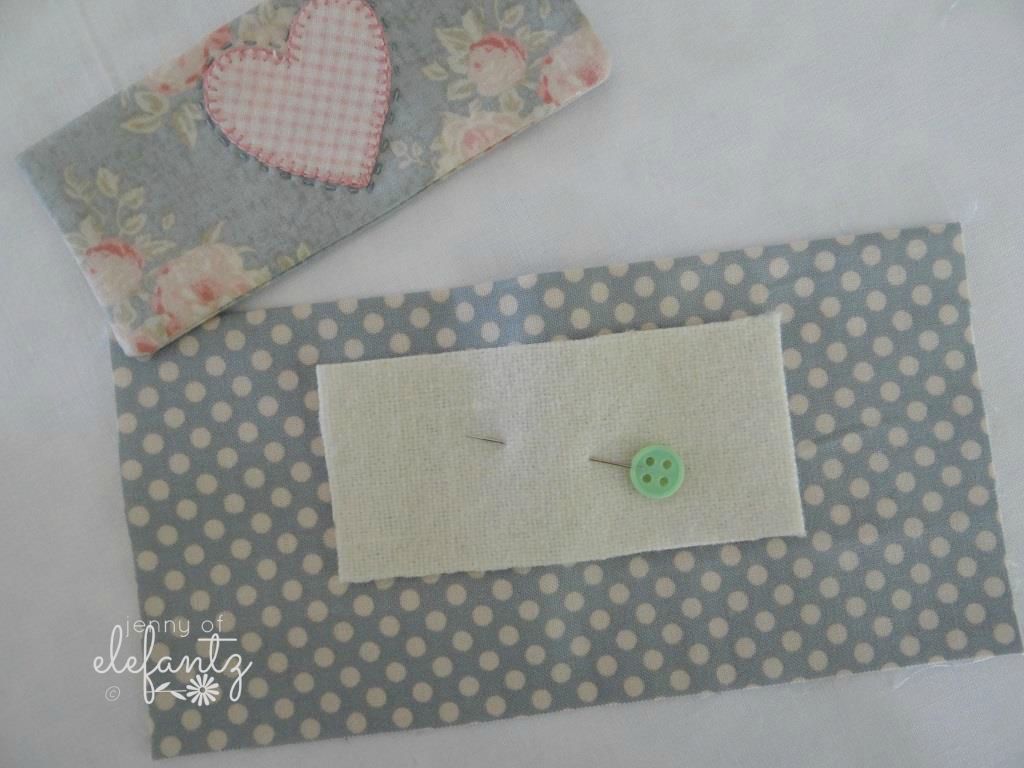
Blanket stitch around the doctor's flannel with two strands of embroidery thread...

Place the needle-book cover over the doctor's flannel so that it sits just below the base of the flannel, hiding it from view. Sew it in place along the top edge with a line of running stitch using two strands of embroidery thread...

Lay the pocket onto your Hussif so that it covers the bottom seam line of your thread pockets.

Sew a 1/8" seam down both sides of the pocket to secure it to your Hussif...

Cut a piece of 1" wide lace slightly wider than your Hussif (about 7 1/2").
Place it over the raw edge of the pocket so that the raw edge is hidden by the lace...

Machine sew a seam along the top and bottom edges of the lace.

This is where we'll finish today.
It's been a long one, so have a careful read through before you begin your sewing.
For comparison in the finish of today's steps here are some pics of my fussy cut version of the Hussif. You can see that I have fussy cut fabrics for the scissor scabbard and also for the applique heart on the cover of the needlebook...


I also chose to veer from blanket stitch under the needle-book cover because felt will not fray the way doctor's flannel will, so I simply used running stitch and corner cross-stitches to secure my felt in place...

Tomorrow we shall make the little pin cushion.
It's a very quick part of the Hussif and can be sewn and finished in 30 minutes - just in case you've fallen a little behind and need time to catch up on the first three days! Okay?
hugs

10 comments:
A little behind? LOL, I haven't done day one yet, but it will probably be next week that I get to do any of it. I've carefully read, though, and I like how simple it seems, the way you have divided everything into steps. I was behind on the table topper from Christmas, too, and I did it later, so I guess this will be the same. I will love having it when I finish, though! Things keep coming up that have to be done and take more time than I think they will.
What a beautiful project and tutorial.
Querida Jenny:
Un trabajo precioso,como todos tus trabajos. Muchas gracias por tu esfuerzo para compartir con nosotros. Muchos besos.
Another gorgeous project - thanks Jen!I'm going to a girls weekend - might be a nice project for then.x
Hallo Jenny, das ist ja so schön, und wenn ich mir so die Bilder ansehe bekomme ich Lust zum Nähen. Du mascht das immer so toll und wunderschön. Danke für deine Arbeit uns das zu zeigen.
Liebe Grüße Annerose
Magnífico. Parabéns!!!!!
Your designs are beautiful, I shall certainly be making a scissor scabbard for mine. x
Wonderful tutorial again today Jenny! I still have not had the opportunity to do any of this, but hopefully today will go smoother than yesterday. LOL. Have a great creative day!
Dankeschön, für diese ausführliche und wunderbare Anleitung!
Love this fantastic tutorial. I'm trying to keep up. Just need to finish stitcheries. Then I can crack on with the rest. Thanks for sharing this Jenny. Xx
Post a Comment