Showing posts with label The Hussif Tutorial. Show all posts

Thursday, June 15, 2017

Taking inspiration and a new look...

The second week of winter has almost passed and the weather has been perfect. 
Mildly cool, resting to the body and mind after a 9 month summer, inviting me to make changes in the moment and plans for the time ahead.

In the moment...

Mr E is enjoying our nourishing winter fare for dinners, meals like slow roasts, curries, stews and of course, yummy pot pies.


I find great delight cooking in winter and have been dragging old recipe folders off the shelf to look through during morning tea. 
Today I have strawberries in abundance so after popping some beef cheeks in a pot to simmer with lots of veggies I'll be baking a Strawberry Shortcake, Jenny-style. 


I have shared this recipe before (in fact it is my friend Fee's favourite dessert and I think she has made it more times than me now) but if you missed it feel free to download my recipe here. 

I'm also regularly spending time at our local library, browsing slowly, enjoying the moment.
I mentioned the other day that my heart is heading towards simple ways to display my stitchery designs, but I also plan to create home furnishings from fabrics already on my shelves, the kind of furnishings that evoke homeliness, comfort, and hopefully an air of times past. 

These two titles came home from from the library this week...


...and they overflow with inspiration.


"The Homemade Home For Children"  has many projects and ideas I'd like to create for Cully May and my other little grandchildren.
Each one is fairly simple, many using large appliques of old fabrics in a new way.


Isn't this tent beautiful!?
I'm sure Blossom and I would happily sit inside to have a tea party with her little girl...


This wall hanging, though featured in the book for a child's room, is high on my to-do list for our own home. 

I think something similar would be lovely hanging above the bed, or even in my office.


Flowers...always flowers, in the moment.
This week I picked up a bunch of carnations for $5 and they lifted the office atmosphere dramatically. Outside my window everything is lovely and green, but I love colour and flowers on my desk provide it...


Planning ahead...

Cully May will turn one on August 4th so Blossom and I shall combine our talents to sew a beautiful birthday dress for her.

Blossom chose the fabric and gave it and a template for the dress bodice to me, because in our joint project my part comes first.


I'll be designing a stitchery for the bodice and embroidering it before handing everything back to Blossom, who will then use it to sew a beautiful dress for Cully May. 

The Cosmo Seasons variegated threads have been chosen to blend with the fabric colours and I've almost completed the sketch for my embroidery, it just needs a little bit of tweaking...


This project is very special to us as it will become an heirloom, a first birthday dress for future babies perhaps.


A new look...

For the longest time I've desired to have some uniformity between the way my blog looks and the cover page of my patterns, so this week I stopped procrastinating and actually dedicated 24 hours to working only on that.
Many pots of chamomile tea were consumed, along with a few sweet treats. Fortunately I had left over lamb korma and Mr E was more than happy to partake of that for dinner while I continued working. 

Emails flew back and forth between Blossom and I, her input and opinion on the direction I was going proving invaluable. 
Honestly, it's a gift beyond words having her know me so well, yet also being another set of eyes to see clearly when I'm so close to a project that I can't see the forest for the trees. 

Fortunately I didn't rush this new look and her excitement over my final draft was the icing on the cake. 

Very slowly over the next month I'll be adding many patterns to my shop, but the nicest thing is that they all have the same cover page at last, and  it co-ordinates with my new blog header. 
I'd love to hear what you think?


And my new blog header?


So there you are dear friends, a productive week so far here at home.

Next time I'll show you another new idea I'm playing with but in case you're looking for a lovely project today, one that can be made to suit your own taste, you may like to revisit my 5-day HUSSIF tutorial from July 2015?

The templates to make the hussif are a free download in my shop...


I also have the set of hussif stitcheries if you prefer the embroidered version, as a purchase in my shop.


To make your own Hussif you can begin here at day 1 of the Hussif Tutorials and follow the links for days 2-5.


Now I'd best be away and get started on that Strawberry Shortcake!

May your day be blessed in every way.

hugs,

Friday, July 31, 2015

The Hussif Tutorial - day 5...

Here we are at the final day of the Hussif tutorial!
How have you gone so far? Have you found the steps in the tutorial easy to follow? Your feedback will assist me when planning future tutorials for the blog, so please consider your answer carefully and leave it in the comments.  Thank you!

Today we're adding the final touches to the Hussif and I have two slightly different binding options for you to choose from. But before we look at them, let's sew some ribbons in place.

Cut two, 12" lengths of pretty ribbon (mine was old and stained which added to the whole vintage effect).

Sew one piece of ribbon just above the top of the scissor scabbard and secure with a button...


You'll be able to tie a bow through the handle of your scissors to keep them safe when your Hussif is complete. You'll see I also added a little mother of pearl button as a pretty embellishment beside the scabbard. You might like to add your own special embellishments? 


Sew your other length of ribbon to the middle of the six-patch section of your Hussif with a couple of cross stitches...


You will wrap this ribbon around your pincushion at the completion of your Hussif...


Now is the time to lay your Hussif onto a larger piece of fabric - this will be the outside cover.


I sprayed a little bit of quilt basting spray between the Pellon and the cover fabric to keep it from slipping during the next step.

Cut around the curve at the top of your Hussif along the traced line...


Sew a length of binding around both sides and the base of the Hussif, leaving the curve bare. Trim away the excess Pellon and outer cover fabric...


Sew a line of running stitch just inside the edge of the curve...


 Trim the excess binding away at the edges of the curve.


Cut a piece of lace 2 inches longer than the curve...


Sew the lace around the curve  (on the cover side of the Hussif) the same as if it were normal binding, folding in the edges at both ends.
Turn the lace to the inside of the Hussif and pin in place...


With a thread the same colour as your lace hand sew it to the inside edge of the Hussif.  I used a tiny running stitch...


Sew a pretty button to the cover, just above the curve...


Measure 10" down the Hussif cover from the centre of the curve and sew a 14" length of lace in place with a cross stitch. Don't sew right through the Hussif, just into the Pellon/wadding...


Insert your scissors in the scabbard, and tie your pincushion in place with a bow. Fold your Hussif up and tie it closed! 


 In my second version of the Hussif I decided to use lace all the way round as binding. This gives a gorgeous vintage touch and is very easy to do. Follow the same steps as attaching a regular cotton quilt binding, but don't fold the lace in half as you would with cotton binding.


And there we have it - you're all done!

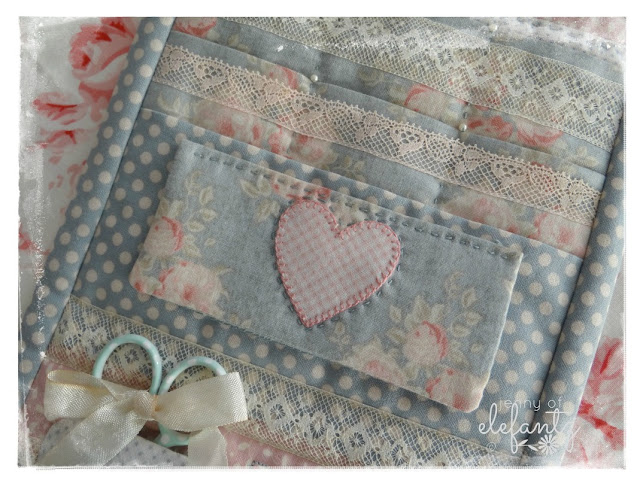
This is my completed Hussif made with Tilda fabrics, vintage lace, ribbons, and embroideries...

And this is my second Hussif made with Lecien's Antique Rose, lace, ribbons and fussy cut patchwork piecing...

...which yesterday I gifted to Mr E's second cousin (and my very dear friend) Heather, for her birthday!

It was a couple of weeks early but as we were spending the day together at her home to sew and chat I decided she shouldn't have to wait. Boy, was she surprised!

She had no idea I was making this Hussif for her, but as soon as I saw the Antique Rose fabrics they had her name marked on them. Her face glowed all day...

Sewing a gift for such a special friend gave me immense delight, but her friendship means way more than any gift.
We supped on fresh brewed coffee and nibbled on Heather's yummy cornflake cookies while we stitched...

...all the time watched by Saruman and Gandalf the cats.

What a good day we had.
As we said our farewells later in the afternoon both of us were contemplating a quote she'd recently read - "Find joy in the simple things."
I think this beautifully describes our outlook on life - but more on that another time. 

(INCLUDES EMBROIDERY PATTERNS)


 I hope you have enjoyed following along with this epic tutorial!
It was labour of love for me, and it's been my pleasure to share it with you.
Please email me photos of your completed Hussifs for a special Show & Tell on the blog later this year. 

Have a blessed day everyone! 
I'm off to brew a cuppa and put my feet up for a while, with a view to the mango tree.

hugs

Prefer to follow this five day tutorial on the blog instead of purchasing the complete pattern?
The links for each day are below -


Day 1 is here.
Day 2 is here.
Day 3 is here.
Day 4 is here.
Day 5 is here.