Showing posts with label The Christmas Wreath Stitch-along 2015. Show all posts

Monday, October 26, 2015

Assembling your Christmas Wreath!

Hopefully by now you have stitched all six blocks and are ready to create your very own Christmas Wreath Mini-quilt!

As shared in each block's instructions, after stitching you should have cut around each hexie shape leaving a 1/4" buffer.
Fold the 1/4" of extra fabric over to the back of the paper hexie shape and hand sew a line of large running stitch around the edges to secure in place. Press the edges flat with a hot dry iron...
Make a seventh 2" hexie shape using some of your red fabric. See if you can fussy cut a piece to give you a centred design. 
Make six 1" hexie shapes from your red fabric, and again, see if you can fussy cut a good centre design.
Press their edges well.

With the papers still inside your hexie shapes, sew all the pieces together (as shown below) by slip stitching along the side edges...


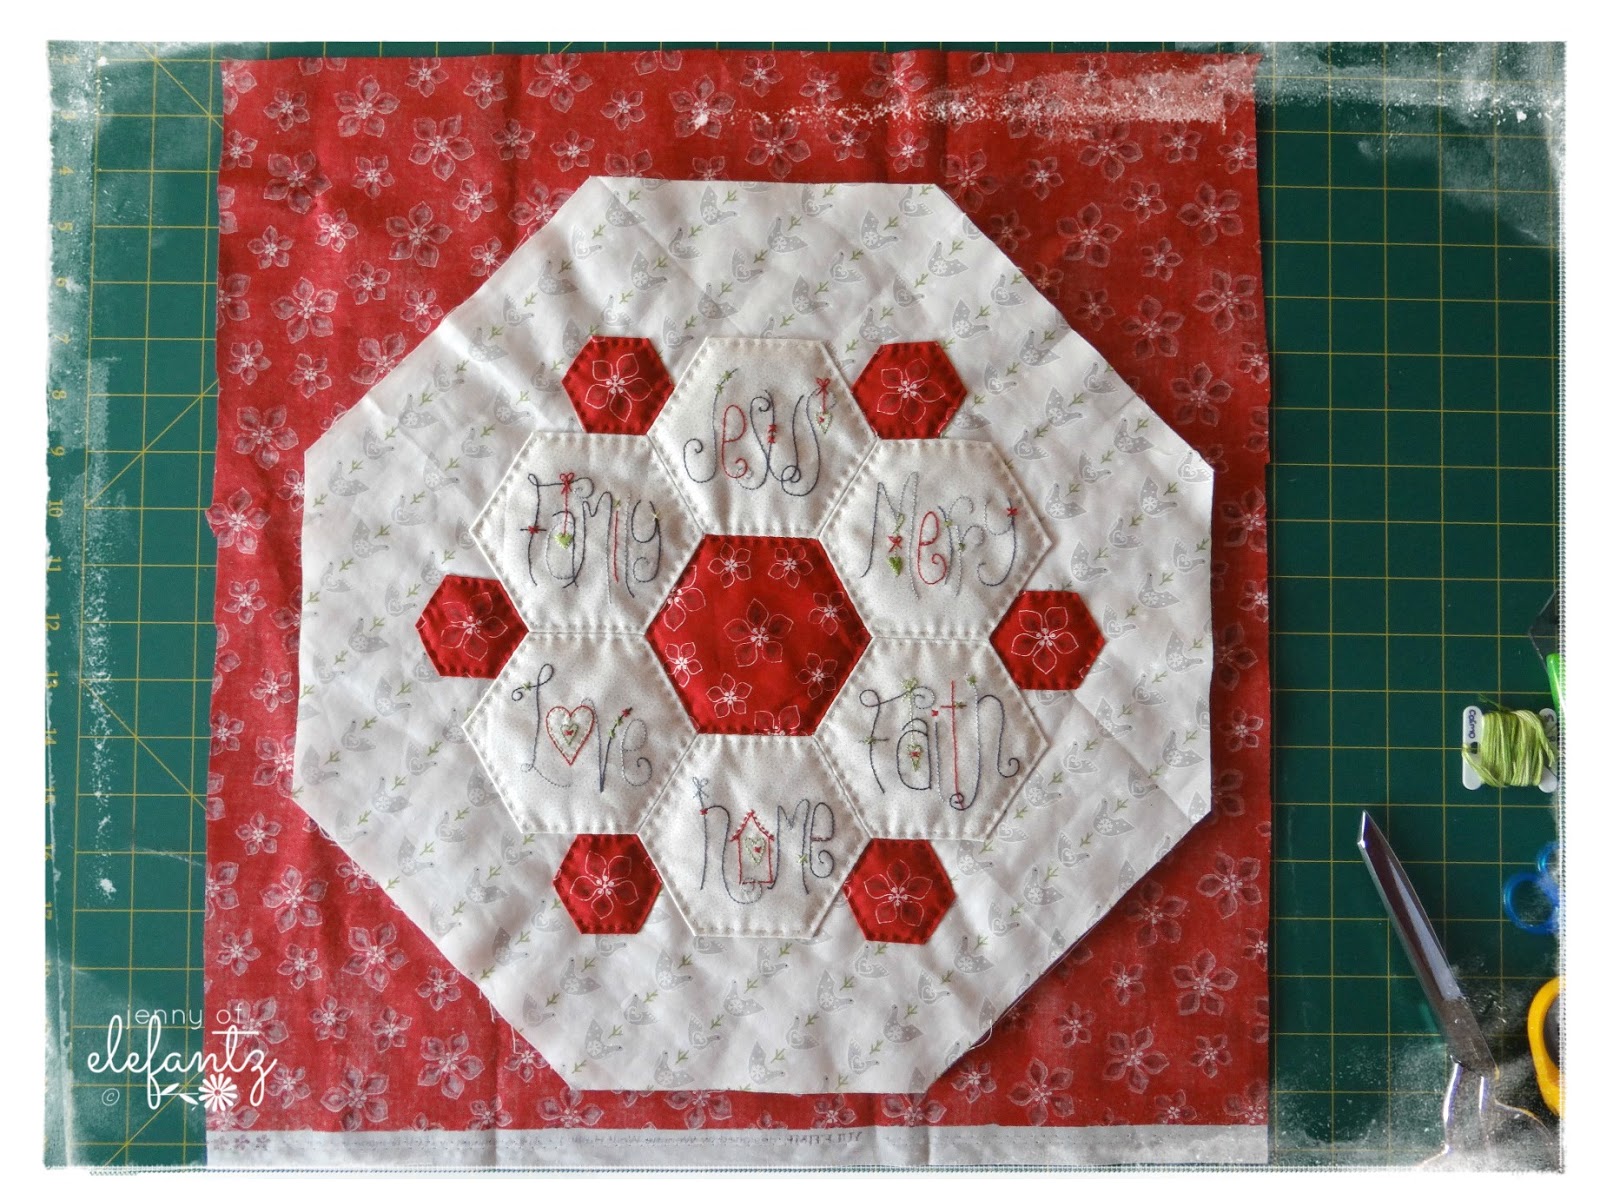
From the front your 'wreath' should look like this...


Press the wreath, then remove the large running stitches and carefully extract the paper hexie shapes.


Next step, cut your background fabric. I chose a silver grey dove print which I cut on a slight diagonal line to give some visual movement to the finished quilt.
You will need a 15 1/2 inch square.
Fuse a same sized piece of Pellon or quilt wadding behind the square.

Measure 5 inches in from each corner and draw a line diagonally to create a triangle...

Cut away each corner triangle.


Hand quilt around the inside edge of all your hexies with a running stitch...


Lay your quilt front onto the wrong side of a square of red backing fabric. Fuse together with basting spray, or hand baste with thread or pins...


Make a length of binding from the rest of your red fabric and sew it around the sides of your mini quilt...

 Trim away the excess backing fabric and press the binding away from the quilt...

...before turning it over to the back and slip stitching in place.

Hand quilt around the large hexie wreath and also just inside the edge of the binding line.
My hand quilting beside the silver hexies was in a contrast red, whilst around the red hexies I used a silver grey thread.


 The quilting along the edge of the binding was stitched in silver grey...


I used a few stitches to secure the mini quilt to the metal hanger for display instead of adding a hanging sleeve. This was because next year I will probably display my Christmas Wreath as a large candle mat or table centre.
Pretty versatile, right?!

Hope you have enjoyed this free Stitch-along. 

This tutorial will remain free on the blog for everyone to use. 

Email photos to me of your completed Christmas Wreath okay? I'd love to see them and share them here on the blog in a special Show & Tell in December.

Have a blessed week!
hugs


UPDATE: A new updated stitch-along begins on my blog November 18th, 2019

Monday, October 19, 2015

Block 6 - family...

I woke with a weather-related migraine today so this is a really quick post to share block 6, "Family", of The Christmas Wreath Stitch-Along...


This is the final block so stitch it up over the next week and on Monday 26th I'll have the finishing instructions to display all six blocks as a quilted wreath...


The blocks and material requirements file to make the wreath mini- quilt are free to download HERE until October 31st. 


 I shall now go and rest until my head decides to settle, whilst thanking the Lord for my wonderfully caring husband who made sure I had all I need for the day before heading off to work with instructions to "call if you need anything..."

I love that man so much. 


Have a blessed week,
hugs


Monday, October 12, 2015

Block 5 - MERRY...


This week's block in The Christmas Wreath Stitch-along is "MERRY" and it's available as a free download HERE in my shop until October 31st. 

The first four blocks are still free as well...

Next week I'll share the final block, and the following Monday we'll put our wreath together with the finishing pattern.

Are you enjoying this project?


I thought I'd show you one of my older patterns which is now available in the shop for instant download, because this month has been very 'home-focused' for me and I have a feeling that is going to be a strong theme behind my designs in 2016...


'The Welcome Home' is a 17 inch mini quilt which features embroidery...


...applique, and patchwork.


The pattern also includes a little bonus pattern of small vignettes from the mini-quilt...


You'll find 'The Welcome Home' pattern HERE in my shop for the next little while.


Have a lovely new week!
I'll be working on a special project that you'll see in a few days, but I'm also taking time out each day to just sit quietly on the verandah and count my blessings, with a cool drink, my Bible and our sweet puppy, Merri...
What about you?

hugs


Monday, October 5, 2015

Block 4 - The Christmas Wreath Stitchalong...

Jesus is my favourite person in the whole world and having His name displayed on this Christmas Wreath delights my heart as He's the most wonderful reason for our holy season of Christmas!

You can download the free JESUS stitchery HERE.

That's four blocks shared so far...

...with just two more blocks to go before we put the Wreath together in week 7.


 Don't forget to check out the Flickr group and see how others are making their wreath blocks.
You'll find it HERE.

Have a blessed week,
hugs


Monday, September 28, 2015

Block 3 - HOME...


Today we're going to be stitching the HOME block of The Christmas Wreath!

Have you finished the first two blocks yet? LOVE and FAITH are still available as free downloads if you've joined in my Stitch-Along a little late.

All three blocks shared so far can be downloaded instantly HERE in my shop
Remember - these blocks are only free until October 31st.

This is what your wreath will look like when it's finished...


The material and thread requirements for making The Christmas Wreath are also a free download from my shop.


Would you like to see some of the blocks others have been making, or be inspired by their fabric choices?
In fact, if you're planning to stitch along we'd love for you to join.


Do you like redwork?

I've put together this little stitchery set as a welcome gift for all new members of The Stitchery Club, but I've also added the pattern to my shop in case others would like to make them up as well.
They're perfect on sewing sets, needle-books, pincushions, or as small embellishments on cushions, journals or bags...


The pdf pattern is an instant download HERE in my shop for just $4.
Imagine what you could make with them?!

But perhaps you'd like to join The Stitchery Club before October 16th because then you will receive this pattern set as your free welcome gift.
All information is over HERE on the Club page with previews of a few of the new patterns for October. 

Thank you for your prayers and wonderful messages during my unexpected head and chest cold season. I'm definitely mending but not quite over it just yet, so I may take things slower on the blog this week and rest up that little bit longer.

bless you heaps,

Monday, September 21, 2015

Block 2 - The Christmas Wreath Stitch-along...

 Have you stitched block 1 of The Christmas Wreath yet?
The pattern is HERE in the shop along with this week's block "Faith"...

Remember these blocks are only free to download until October 31st, so you may like to let your friends know and they can stitch along with you!


FLICKR Group is now open.
 
Want to show my readers your own Stitch-Along photos?
I've set up a Flickr group for you to share pics of your fabrics, blocks stitched along the way, and eventually your completed wall hanging.
The Christmas Wreath flickr group is HERE and it's open to anyone who's participating. 
I hope you join as I'd love to view the different versions being created and see what fabrics you've chosen. Inspiration goes both ways! 

Measuring the 2" Hexies

I've received a number of emails, Instagram and Facebook messages this past week asking 'how' to measure a 2 inch hexie, and I realise that I should have shared this when I released the Block 1 pattern as not everybody is hexie literate. 
In fact I only learned how to work with them last year  so I apologise for not showing you sooner.

It's is not measured across the centre as a few of you thought, but across one side of the shape...
 You will need seven 2 inch hexagon shapes and six 1 inch shapes to make the Wreath.
(I'll be sharing a tutorial for the final piecing on October 26th)
If you do not have the papers already you can download free templates for printing and cutting HERE


 The Stitchery Club patterns for September were emailed to all members last Thursday, which means each individual pattern is available as an instant PDF download in my shop now for all non-members.


Purchase any or all of these six new Elefantz designs HERE...


 Have a wonderful Monday and may it flow right through the rest of your week!
hugs